
Habit Coffee Shop: Using Simple Shapes to Draw Buildings
I wanted to take a more practical approach to this month's blog post by showing you how I break down a building into simple shapes for drawing. My hope is that you can use the way I draw buildings in your own artwork as well, with a new perspective.
I am a completely self-taught artist and so while my methods may not be as technical as other artists, it works very well for me and is how I now approach all of my drawings.
I really enjoy how painting a building from a straight-on perspective captures a place's character and detail. My hope is that after you're finished reading this blog post, a spark of inspiration will stir you to create something.

Before you start sketching
This blog post is great for beginners or those wanting to try something new with their style. You could easily apply what you learn below to create beautiful pieces of artwork for friends and family of their favourite holiday places or even homes.
I am going to be going over how I would approach a popular cafe in Victoria, BC - Habit Coffee. By the end of this blog post, you'll have a great idea for how to start your next architecture drawing!
With that said, let's go over what materials and resources I use for a sketch.
Reference photos
The first step to breaking down a building into shapes is to find reference photos. I love European architecture and buildings, but since I live in Canada and I can't actually visit these buildings as often as I'd like, I need to use reference photos.
Depending on the building, I will grab 1-3 photos to use for reference. This is so I'm not copying a reference exactly, and so that I can make sure colours, signage, and foliage are up to date.
If you have a building you want to draw that you can visit in person, even better.
Pro tip: If you can't find decent photos of the building by Googling it, check Instagram (most business have accounts), or try Street View in Google maps.
Get materials ready
This one is pretty straightforward. Whether you end up using paint or you only have a pen or pencil with you to practice your urban sketching, the same techniques apply.
The absolute basic materials required:
- Paper
- Sharpened pencil
- An eraser
Some other optional materials you may want to use:
- A black pen for inking
- Colouring medium (paint, pencil crayons, pastels, etc)
- Ruler
Start with the biggest shapes, finish with details
Now that you've got your reference photos and your materials ready, it's time to draw.
The biggest takeaway I have from this process is to start with the biggest shapes, and go smaller until you're adding fine details. It can be overwhelming to approach a drawing and only see the details, and this approach helps you to start with the bigger details and work towards the smaller ones.
Habit Coffee
With that said, let's get started.
Here are the reference photos I'll be using to draw Habit Coffee in Victoria BC.
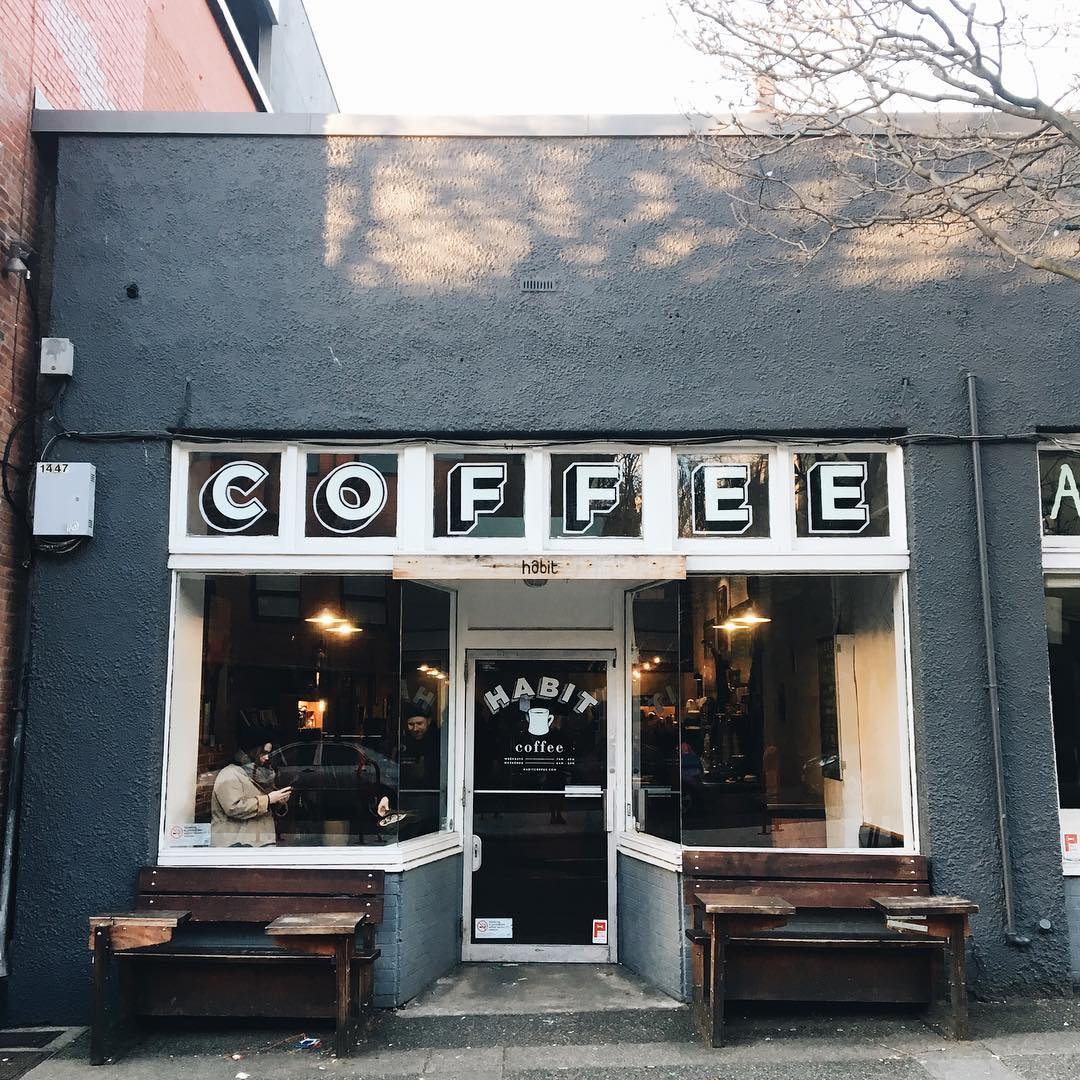
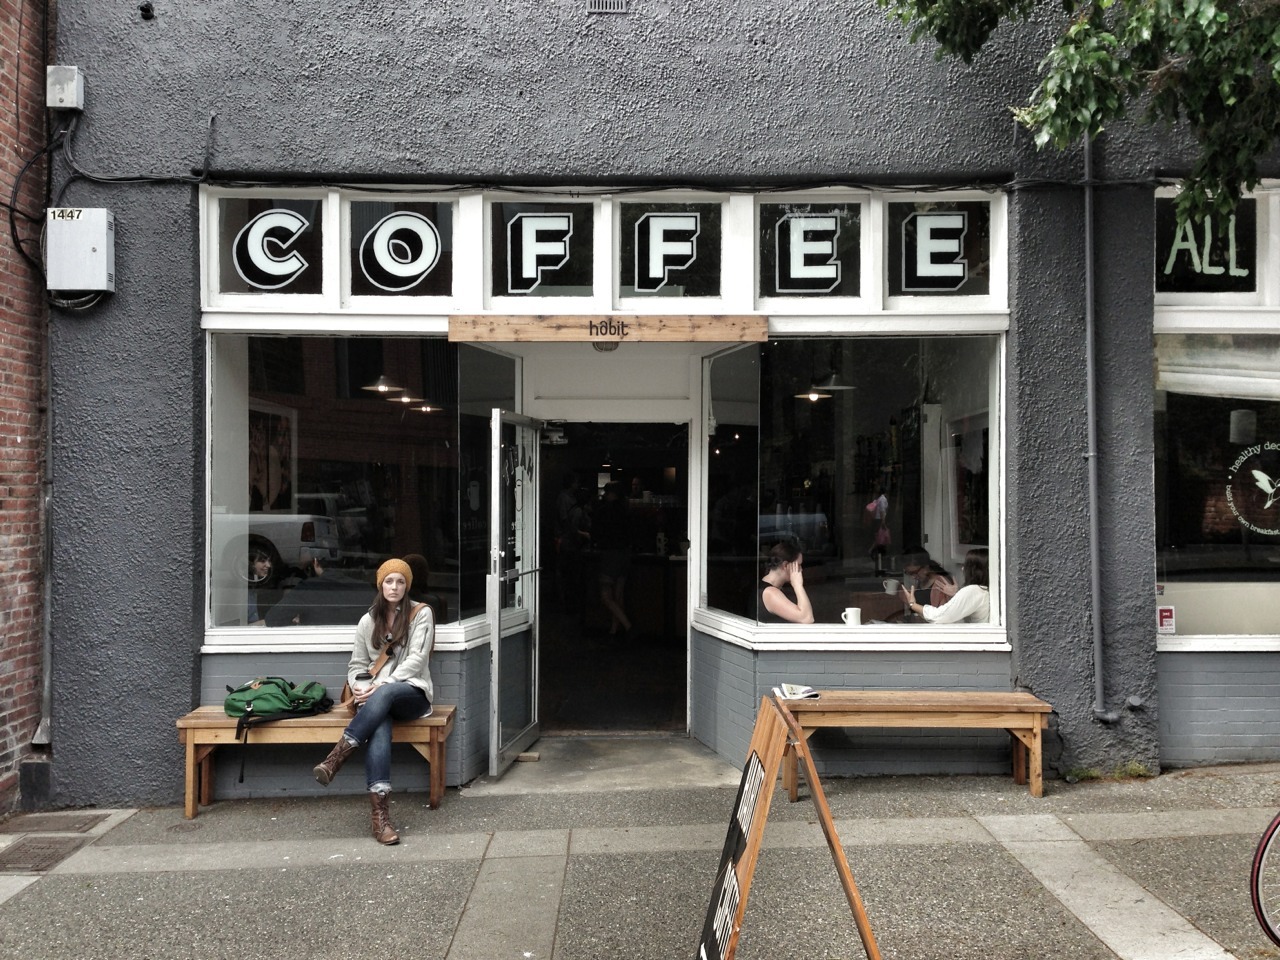
Looking at this building, and starting with the big shapes, you can see pretty quickly that it's a basic square, with only a few windows and no crazy signage or details. So, I will simply start by drawing a square.
We are off to a crazy start!

 I left a little bit more room on the bottom of the drawing for the sidewalk.
My lines are generally pretty wonky because my hands are shaky af, and I kind of like how they turn out imperfect. I choose not use use a ruler for most paintings and it gives my drawings a bit more character.
Next, I'll have a look now at how I can break this down into proportions. It's not really required for a building this simple, but it can be very useful. In future blog posts, you'll see how handy this step is for complex buildings.

For this cafe, I can break it into 6 parts.
This is where a ruler can come in handy for measuring, though, I encourage you to try to do this by eye. It is a good habit to learn to visualize proportions intuitively and will help in the long run whether you're drawing buildings, faces (especially faces), plants, animals, people, etc.
I can see that the window will go about 1 part above the ground, and 2 parts below the top of the building. That means the window itself takes about half of the building.
I'll start by drawing a line down the center, marking the middle, and going from there.
Remember to draw lightly so that it's easy to erase later.


Now that I've drawn the window, and I know where my COFFEE signage will go, I will draw 5 small vertical lines for the windows, which will help me see where the large windows on either side of the door are.


Door time! The door is smaller than the windows, and just a plain old rectangle. The top of the door doesn't reach the COFFEE sign, and the bottom of the door doesn't quite reach the ground.
 I am erasing as I go so that the image is clear and I know which lines I'll need to ink.
For the sake of simplicity in explaining this blog post, I am choosing not to include the benches. I'll have to use my imagination for what is behind them. I'll also connect the door to the windows with some diagonal lines. This is what gives the building some depth.

 Halfway there!
Time for details. I usually start from the top and work my way to the bottom. I can see a long, thin rectangle on the top of the building (fascia), a couple of power boxes on the left-hand side with cords, and a teeny tiny vent in the middle top section:


Next are the small window frames where COFFEE will go, and borders along with the windows and doors. Also, the thin rectangular 'habit' sign:


Next is signage and lettering:

 The signage really pulls it together!
Lastly, time to finish off with any smaller details, such as window reflections, sidewalk lines, or any foliage you'd like to add. This is where having multiple reference photos comes in handy.
I've decided to add the sign they have outside to help balance the drawing. I've also added people in the window - I haven't put much detail into the people, as I want the focus to be on the building itself.
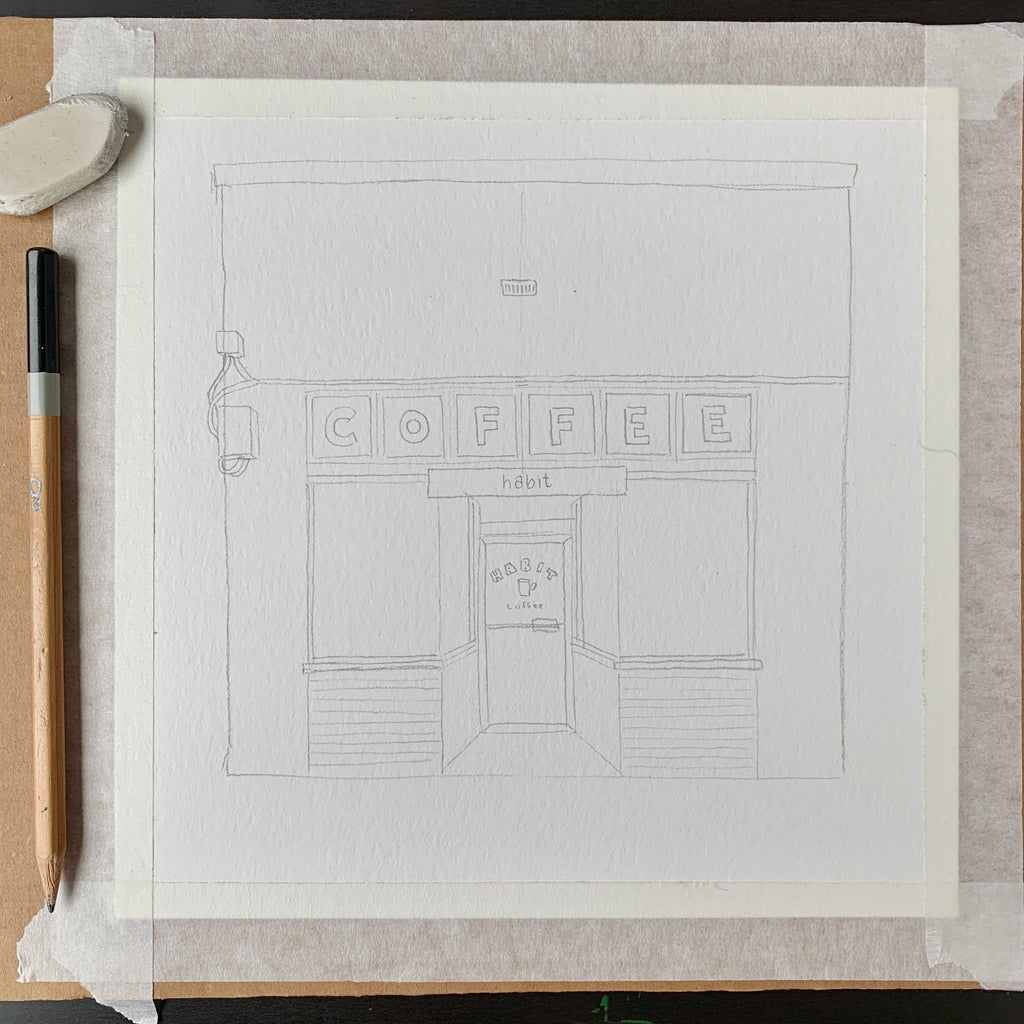
And there we go! A finished sketch that is ready to be inked.
If you're not sure what sort of pen/ink to use with your watercolour paintings to prevent bleeding, I've written a thorough review of some popular black drawing pens here in this blog post.

The Final Drawing
Here is the finished drawing after I've outlined it, as well as the finished painting!


Looking back, remember that I started big, and finished with small details. This is the exact same approach I take with all of my architectural drawings.
I hope you feel motivated and inspired to create your own painting or drawing, whether it's the Habit Coffee shop from this blog post or another building in your city.
If you are new to watercolour and want to learn more tips, have a look at another article I wrote called Beginner's Guide to Basic Watercolour Techniques!
If you end up drawing a building after reading this post, please tag me in your Instagram stories or posts (@andie.laf.designs) so I can see your hard work!
Thanks for reading, and happy creating :)
 Andie Lafrentz has been working as an artist full-time since August 2019, after she quit her job at a tech company. Through watercolour and ink, she combines bright, lively colours and her love of travel to create pieces that express the way she sees the world.

Thanks for this 😊 I recently started buildings, I was inspired by some of your paintings I think I saw on PIN interest. Its great that you’ve explained this process with easy to follow instructions.
This was such a great article. I just discovered your work on Pinterest and found your website and blog. The step by step drawings with written details help so much. I am going to search for some photos . Or go out and take something new facing straight on and see if I can create a watercolor pen and ink. Thanks again so much.
Thanks for explaining your art in such a nice way. I really appreciate and love your drawings. Merci infiniment pour le partage !